Foil Stamping
When a print project needs an elegant, non-tarnishing metallic finish to be applied to paper or a similar substrate, it’s easily accomplished using a process referred to as foil stamping or hot stamping.
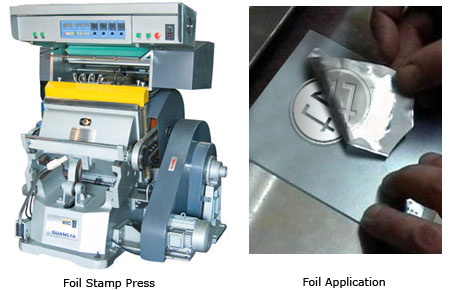
The Process
Foil stamping or hot stamping (as it is called when heat is applied) requires a metal plate with an engraved image. The plate strikes a foil film, transferring the foil coating from the roll film onto the substrate that is to be imprinted.
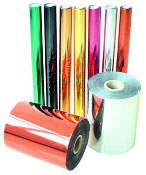
A wide selection of foil colors, finishes, and effects are available such as gold, silver, and colored metallics; marble, leather, wood, snakeskin, and pearl finishes; and geometric multi-dimensional patterns.
General Use of Foils
- Foils can be used for logos or accents surrounding logos, borders or highlights surrounding images, and elegant accents for distinctive symbols, images, graphics, or lines.
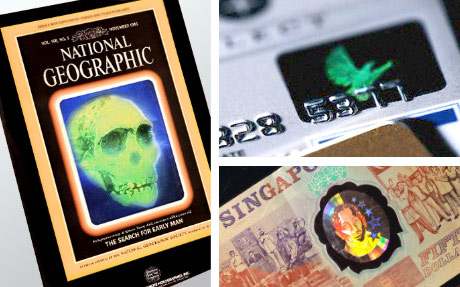
- Foils provide security for tamper resistant seals and security for documents. Holograms and foils have been used as seals for software or video products, and security on negotiable documents because they effectively display a tear if a foil seal is opened or torn.
- Documents that are not to be reproduced or counterfeited, such as background images in driver’s licenses, membership cards, credit/debit cards, or personal identity badges, utilize foils and holograms for security. Foils and holograms are difficult to reproduce.

Holograms – An Alternative to Standard Foil Colors
Another foil product for the hot stamp process is the hologram. A hologram is a 2 or 3-dimensional image developed photographically with the use of lasers to create the graphics or photo images.
Holograms don’t just protect against counterfeiters, they are also utilized to make a design or image stand out from the page.
How it Works
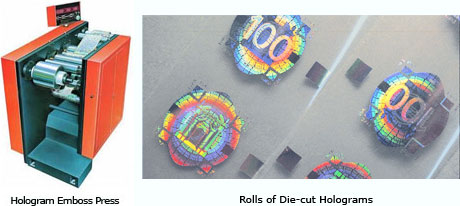
First the hologram is made on a light sensitive resist plate. This copy is stamped into acrylic as a tiled pattern to form a recombined master shim. This is metalised and a final nickel embossing plate produced.
The recombined master is analogous to a printing plate which is attached to a steel embossing roller and under heat and pressure embosses a relief structure into the polyester plastic. Adhesive is applied to the back and a release paper attached. Finally the holograms are die cut to size and wound onto rolls for either machine or hand application.
Four types of holographic images are available for a print project:
- Patterned Images are geometric designs throughout the foil in either a repeated or random pattern.
- Images are realistic 3-D illusions of various inanimate objects.
- Multiple Plane Images are layered and repeated several times to create a 3-dimensional effect.
- Stereogram Images are 3-dimensional images of live objects presented in active sequences. Generally, the stereogram image is the most expensive hologram to produce.
Planning Tips for Foils
Stock Selection
- Coated stocks such as clay or cast coated papers are the best paper materials for foil stamping since they are the most workable. They generally allow for greater area coverage without distortion or breakup of the foil. However, large areas of solids can lead to complications, such as gas trapping, which can cause the foil to bubble on the surface of the stock if the die has not been sandblasted prior to use.
- Vellum surfaced stocks with 25% rag content are excellent stocks for stationery products.
- Use caution if the printed piece is to have a coating applied prior to foil stamping. UV coatings or varnishes containing a high level of wax are not receptive coatings for foil stamping. Aqueous coatings or wax free varnishes provide the best surface results for foil stamping.
- If foil is being applied to laminated sheets, make sure the surface tension, also referred to as the dyne count, is higher than 40. Less than 40 will result in the sheet cracking and tearing.
- A coated and smooth stock is the best choice for hologram images. Uncoated or textured stocks will provide a dull or broken appearing image, destroying the true effect of the hologram.
Foil Selection
- Use caution when selecting a foil to be used on any document that will be imprinted on a laser printer. Choose a foil that has a high resistance to heat.
- Consult a Pantone Foil Color Selector when making a color selection from the hundreds of foils available.
- If two different foils are to be used and are to overlap, make sure the foils are compatible. Some foils will not adhere to other foil materials, so check this before foil stamping.
Artwork Preparation
- Set copy or create images with fonts above 8 point and lines thicker than 2 point. Use images that are more open and have fewer thin lines. Foils will have a tendency to fill in small, enclosed areas, thin lines, or closely kerned text. Thin serifs do not hold foil well unless the copy is stamped twice with the foil, which becomes time consuming and costly for the job.
- It is generally best to prepare images slightly larger than the size desired. This is to compensate for the resulting dimensional effect that occurs because the paper thickness tends to change the size of the image.
- Copy or images with very close registration may involve extra work and greater cost. Be careful not to use trapping techniques on any artwork appearing adjacent to foil stamping.
- Screened copy and images with changes in tones do not reproduce effectively into dies.
- If a bevel die is to be used, the artwork for the image and copy may need to be slightly enlarged to compensate for the image and copy reduction that occurs due to the beveled edges.
- On foil holograms, create and imprint the image with rounded corners to provide the best results.
- Keep images at least 1/2” away from the edge of the stock being foil stamped in order to eliminate wrinkles that will occur if the image is too close to the edge of the stock.
- For pattern holograms, provide line art of the desired pattern or shape.
- For 3-dimensional images, provide an actual item that is to become the image in the hologram. Laser technology will then be used to reproduce the image.
- For multiple-plane holograms, line art will be required for all 2-dimensional planes. For 3-dimensional planes, an actual item in the actual size will be required for reproduction.
Image and Die Preparation
- If film negatives are to be made for the dies, they must be prepared emulsion up.
- If the image has no appearance that easily indicates the direction of the image, mark the film “right read” to show which side prints up. Identify the top or bottom of the image so the engraver will understand how the die must be positioned for proper foil stamping.
- Color key proofs, used for viewing the proper image direction, are of much assistance to the engraver when building a die.
- Make sure the film image is not distorted or changed in size from the original copy.
- If stock is to be embossed and also foil stamped, prepare a separate piece of film or separate digital artwork for each image.
- For multi-level or dimensional dies, an engraver must be provided with a solid, opaque, film for each layer to be embossed. The opaque film identifies the silhouette area of each layer. The engraver must also receive film for the line art that will contain the images to be embossed. Provide a set of color keys that will be in register with the film and visually show the intended image layers in registration.
- As a general practice, make sure the engraver has a color key, a mock-up of the design, and any samples illustrating and defining the edges, shapes, and levels of the image in order to assist with identifying exactly how the image is to appear when foil stamped or embossed.