Designing for large format printing like wallpaper comes with its own set of unique technical challenges. Due to the size of the medium, extra consideration must be given to the files submitted for production. This article aims to demystify the process and make it accessible to anyone wishing to work with a printer on wallpaper designs or any other large-scale project.
RGB vs CMYK: Battle of the Color Modes
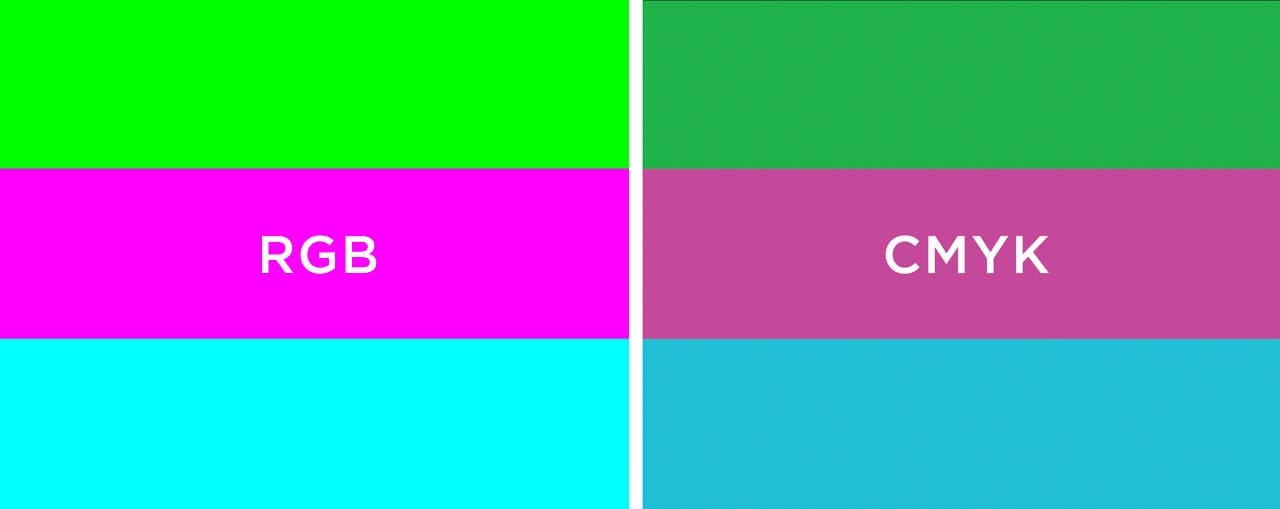
Incorrect color modes are among the most common issues faced by professional printers. “Why doesn’t the print match what I see on my screen?” is one of the most frequent queries from customers.
The main problem here is that the vast majority of images you find on the internet and on digital cameras will be RGB (Red Green Blue) - a format explicitly designed for screen use. There are certain colors in this mode which are impossible to reproduce with traditional printing inks, especially when dealing with fluorescent colors.
By contrast CMYK (Cyan, Magenta, Yellow, blacK) is based on the four inks used in commercial printing applications, ensuring a more faithful representation on screen of what you will be printing.
Note : For projects where color matching is absolutely critical, it is recommended to ask your printer for a press proof.
Fortunately, setting the right mode is quite simple:
In Adobe Photoshop
Click on the Image Menu, scroll down to “Mode” and select CMYK, then save your image.
In Adobe Illustrator
Click on the File Menu, scroll down to “Document Color Mode” and choose “CMYK color”. This will also automatically transform any embedded images in your file to CMYK as well.
The Importance of Image Resolution
By far, this is the most important concept when designing for anything larger than a small poster. But what exactly is resolution? Wikipedia defines it as “equivalent to pixel count in digital imaging”. But what does that mean, and what are pixels?
The easiest way to understand this is to think of every digital photo or image as a mosaic composed of tiny square tiles. Each tile is a pixel, and the amount of detail one can attain in the mosaic depends entirely on how many of those little squares go into the overall image.
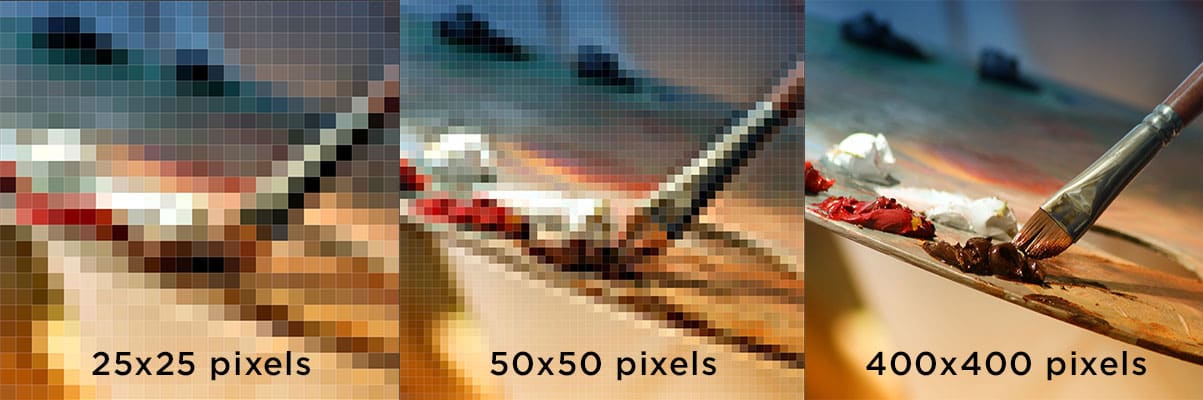
The image on the left measures 25 x 25 pixels. The resolution is so low you can see the pixels more than you can see the actual image.
At 50 x 50 pixels the middle image has twice as much detail. You can now decipher what it is, however it still looks blurry.
The final image is 400 x 400 pixels and while it looks great on the screen, if you printed it bigger than 2 inches it would also look blurry. This is because computer displays operate at 72 pixels per inch, while high quality printing is at least 300 “dots” (the printing equivalent of pixels) per inch.
Finding the Resolution
So you’re ready to roll your sleeves up and tackle this resolution issue. Let’s say you already have an image on your computer and would like to see if it works for final print. There are several ways to determine this:
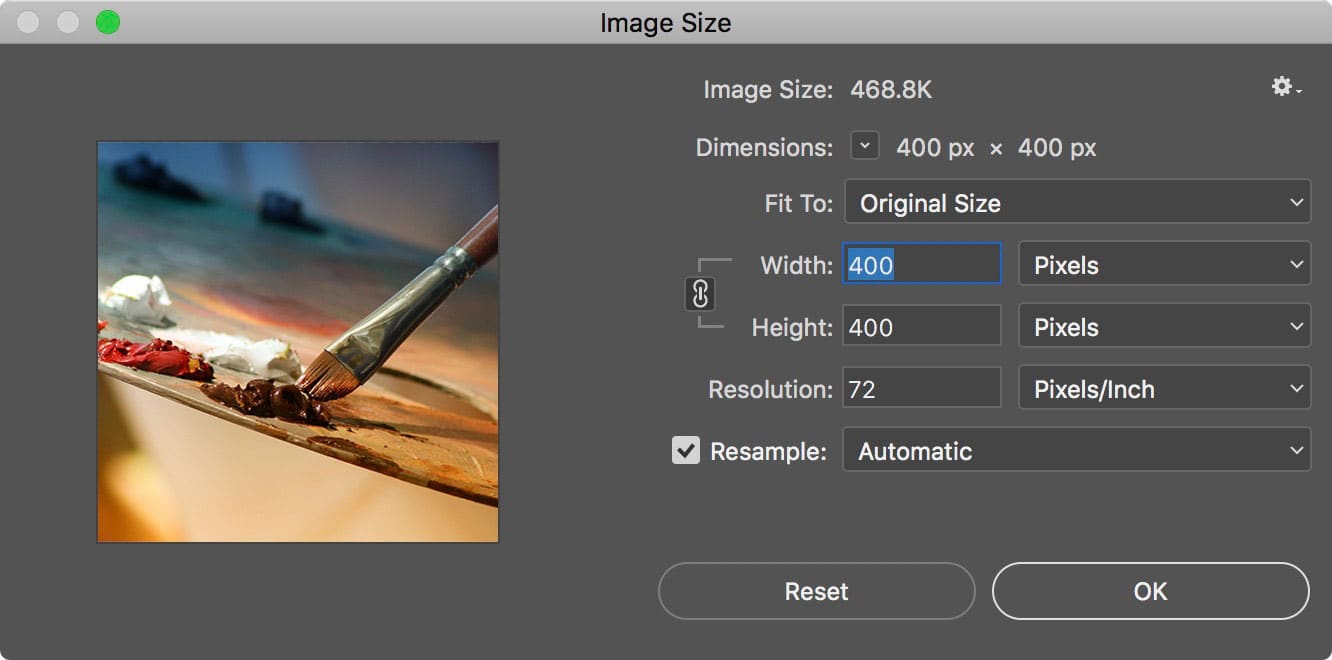
Using Adobe Photoshop
Open the file in Photoshop, click on the Image menu and select “Image Size”. It will not only tell you the physical size of the image in inches or cm, but also the actual resolution in terms of pixels per inch.
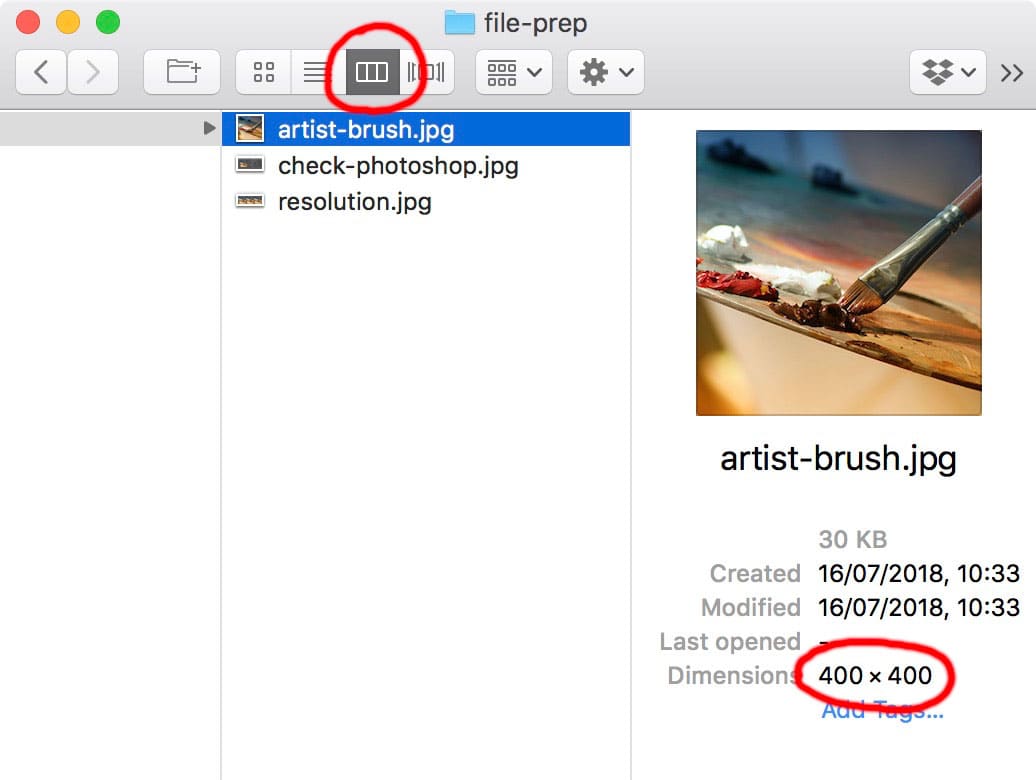
Using Mac Finder
If you go to your folder, and switch to column view mode (third button from the left), then click on the image, you should see a preview of it in the far right column along with some details underneath, among which you will find the pixel dimensions of your image (width x height in pixels)
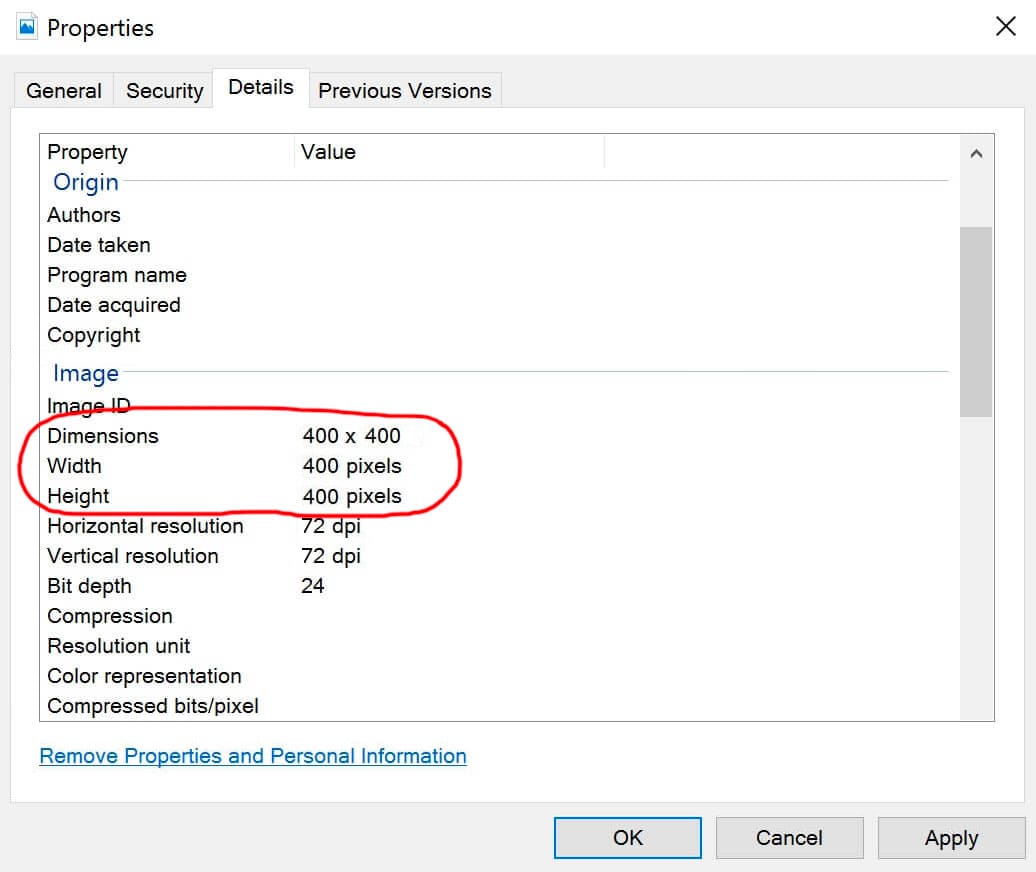
Using Windows Explorer
Right-click on the image and then select “Properties.” A window will appear with the image’s details. Go to the “Details” tab to see the image’s dimensions and resolution.
Is The Resolution High Enough?
Once you know the pixel width of an image, some simple math can help calculate if the image will print well. Just divide the image width in pixels by the desired printed width in inches. For example, 2000 pixel image divided by 20 inch printed width gives us 100 pixels per inch.
Note : For any large format printing project, you want your files to be at least 150 pixels per inch, though higher resolutions may be preferred for highly detailed graphics.
Editing Resolution
A common question we receive is “Can we just add more resolution?”. This is a valid query and technically you can do just that. In Adobe Photoshop you can click the Image menu, select “Image Size” and just punch in bigger numbers. The problem here is that you are just using more tiles/pixels to represent the original, low quality image. No new details are added and all you achieve here is adding to the file’s size with no visual improvement.
A standard image @ 1000 pixels wide
Same image zoomed in @ 1000% and with resolution increased 10x. Notice the pixelation and blurring.
A better quality source image, zoomed into the same level of detail.
To ensure the quality of your wallpaper print, high resolution in the source file is key. For wallpaper projects using stock images, this usually means paying for the highest available resolution to ensure faithful reproduction at large sizes.
For those who are producing images with a digital camera, it is similarly recommendable to adjust your camera to maximum resolution (Raw Image Format) to eliminate blurring and pixelation.
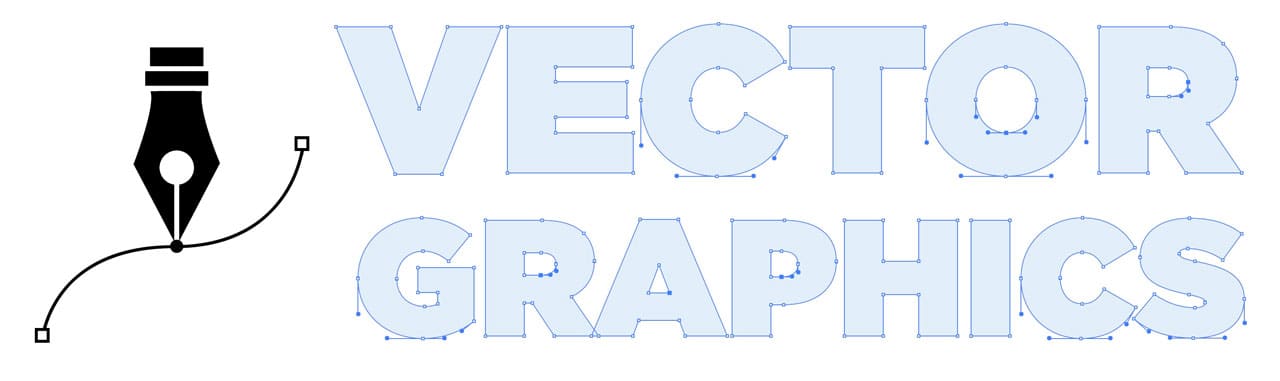
The Power of Vectors
What if we told you there was a way you could skip all this ceremony and create files that have zero resolution, yet print with amazing clarity at any size? This is exactly what vector art does.
Simply put, vectors take a completely different approach to graphics. Rather than build a mosaic of many tiles, images are built on a series of points, lines and curves, mathematically plotted on a 2D grid.
This not only drastically cuts down file size, but ensures that the file can be printed at any size, even a giant billboard will not lose image quality. The only catch is that vectors use solid shapes for rendering which makes them a poor choice for photographic murals, but more than ideal for most graphic patterns.
To highlight what makes vectors special here is an SVG file:

If you were to increase the font or zoom level of your browser, the image would appear clear no matter how close you got. Here is a side-by-side comparison of this same image in pixels vs vectors zoomed in to 1000%:
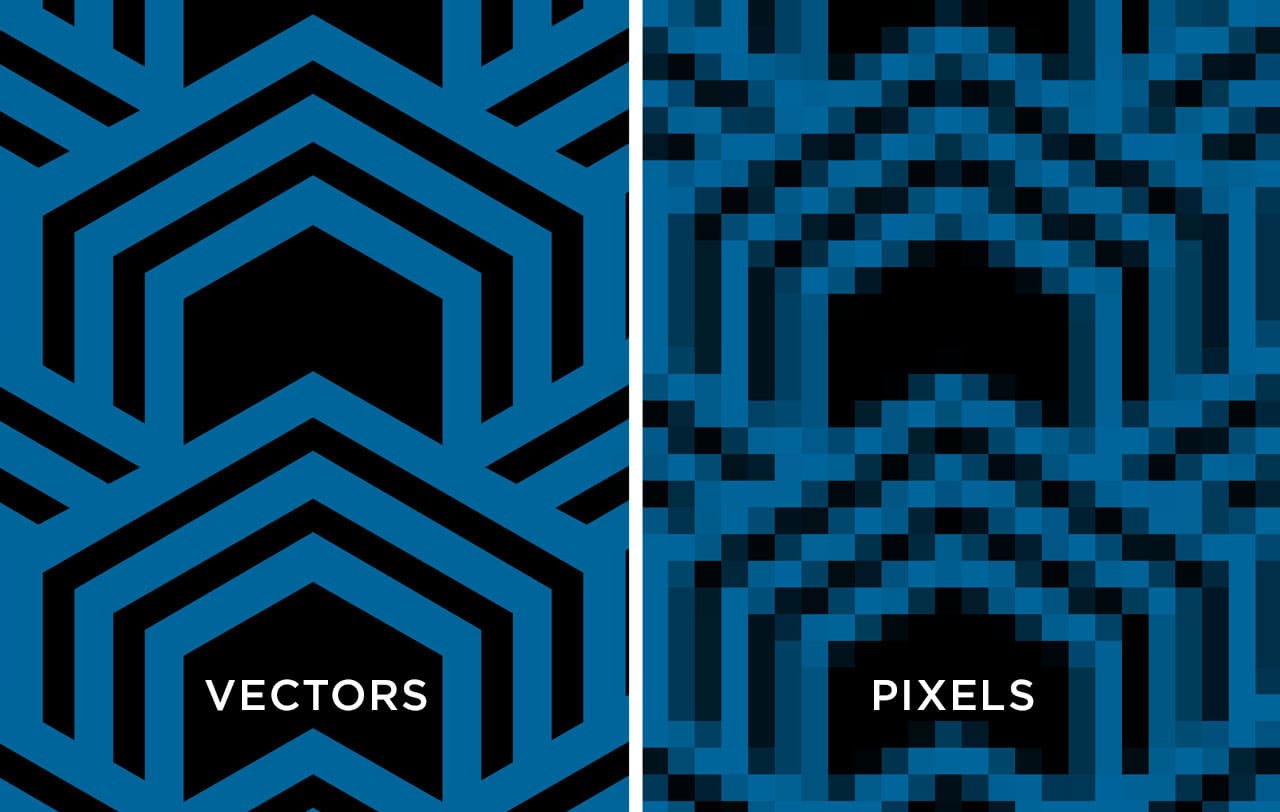
This is possible because vectors are “resolution independent” and are basically coded instructions for a printer. The best part is that you don’t have to understand code to leverage this powerful file format. Indeed, most of the major stock image houses provide an impressive collection of vector graphics
You can also use a program, like Adobe Illustrator to create vectors from standard images. While the end results for photos are not always ideal, this is a valuable tool for making sure that logos, icons and other crisp graphics retain their detail at larger sizes.
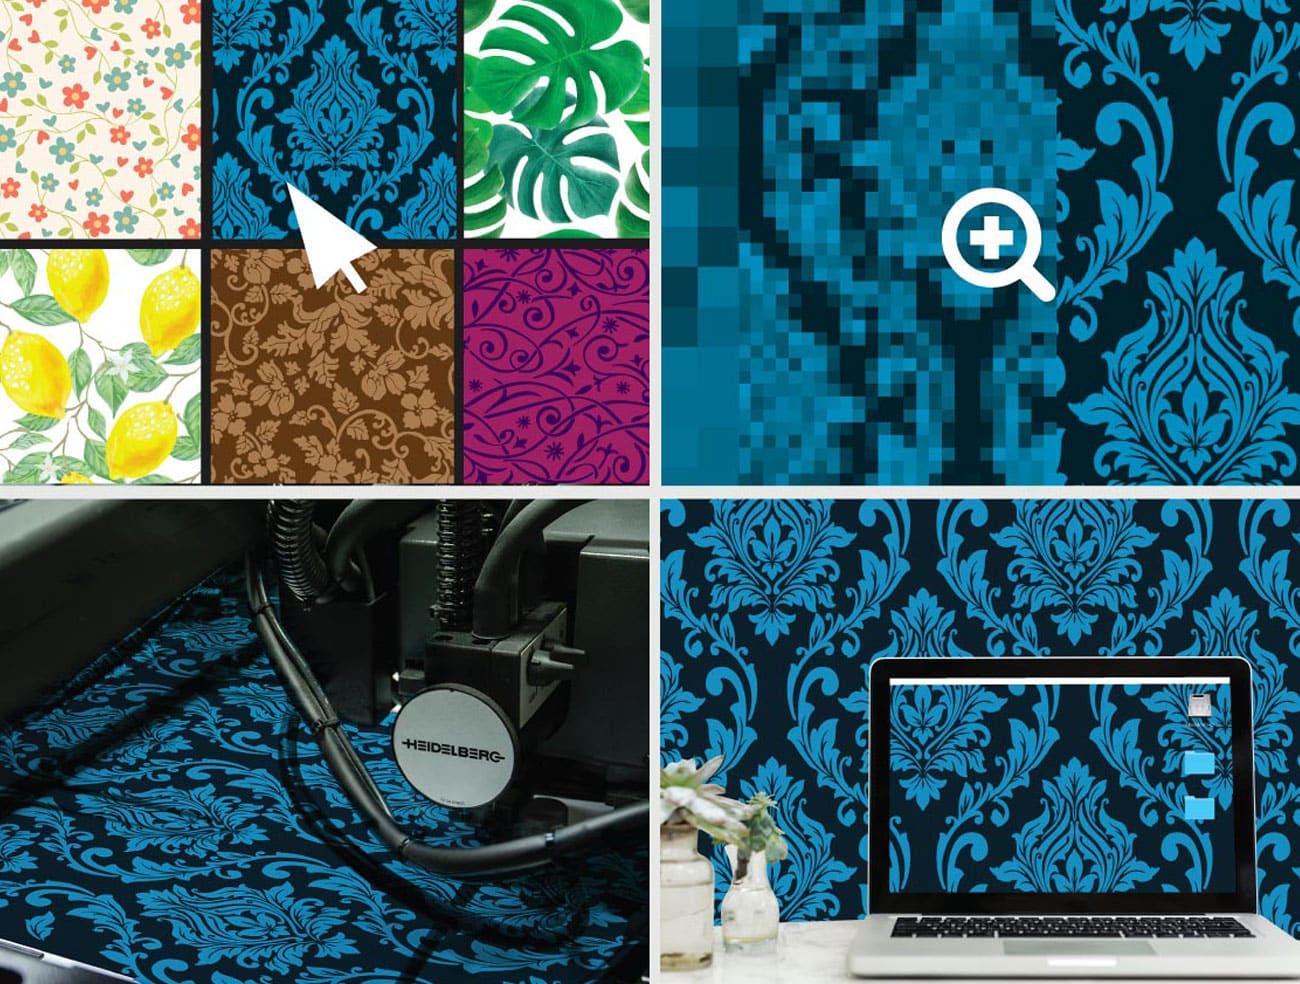
Designing Wallpaper Patterns
As discussed in a related article the first step is to identify the core part of the pattern which is being repeated. Here’s an excerpt from that article:
The core pattern of a wallpaper design can be determined by finding elements which are repeated both vertically and horizontally, creating a square or rectangle around the repeatable area.
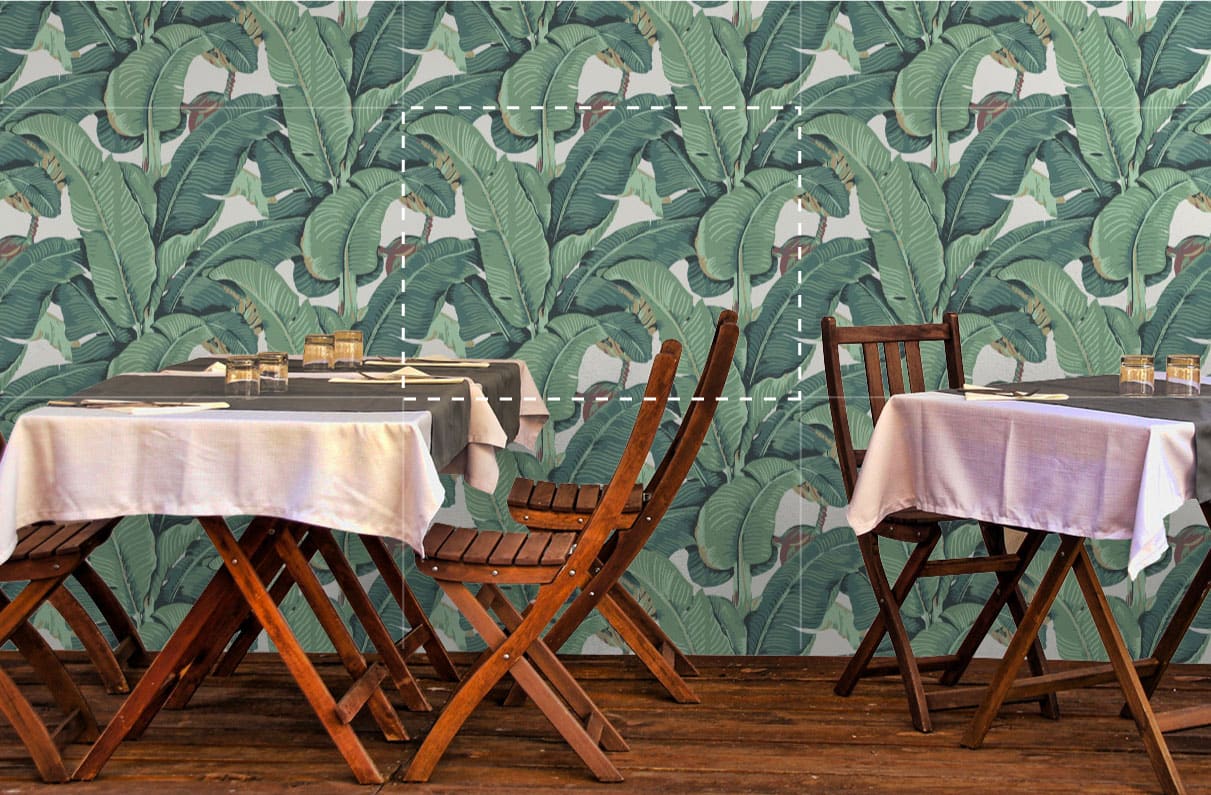
Creating Perfect, Seamless Tiles
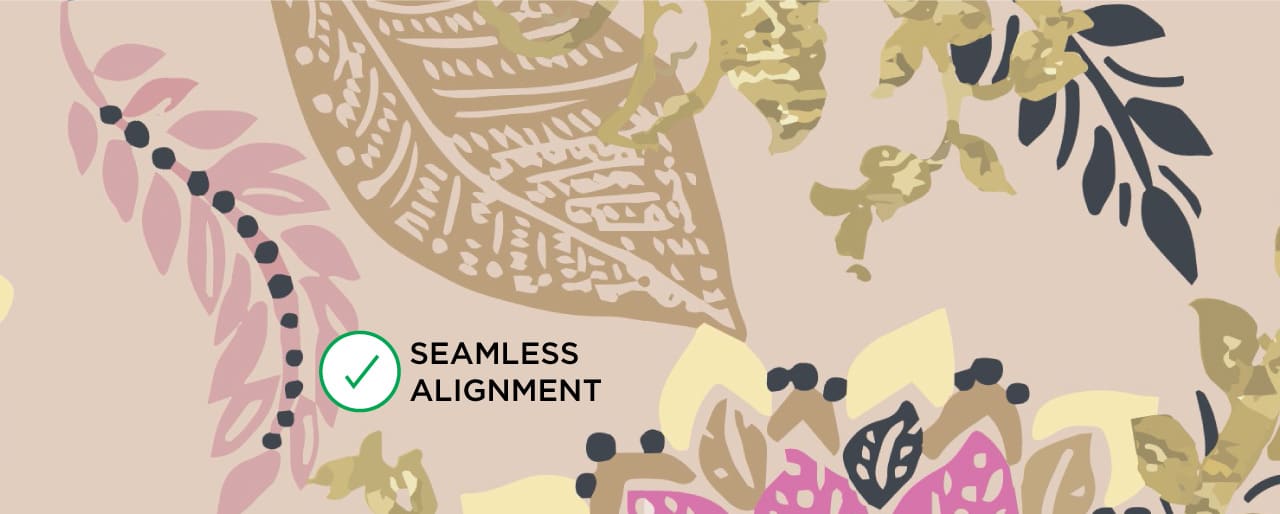
By far one of the most common challenges we face in user submitted designs is ensuring that the pattern itself is 100% seamless, so each panel flows into the next without any change. The easiest way to do this is to simply make copies of your design and put them side by side to check horizontal seams, then above and below to check vertical seams.
Here’s an example of something we were sent. At first glance it looks great, but zooming in (at least 500%) reveals imperfections. There is a break in the design where some elements are not aligning properly.

Our designers went in and cleaned up the design to ensure that all elements are lined up and the border between each repeated section is completely invisible.
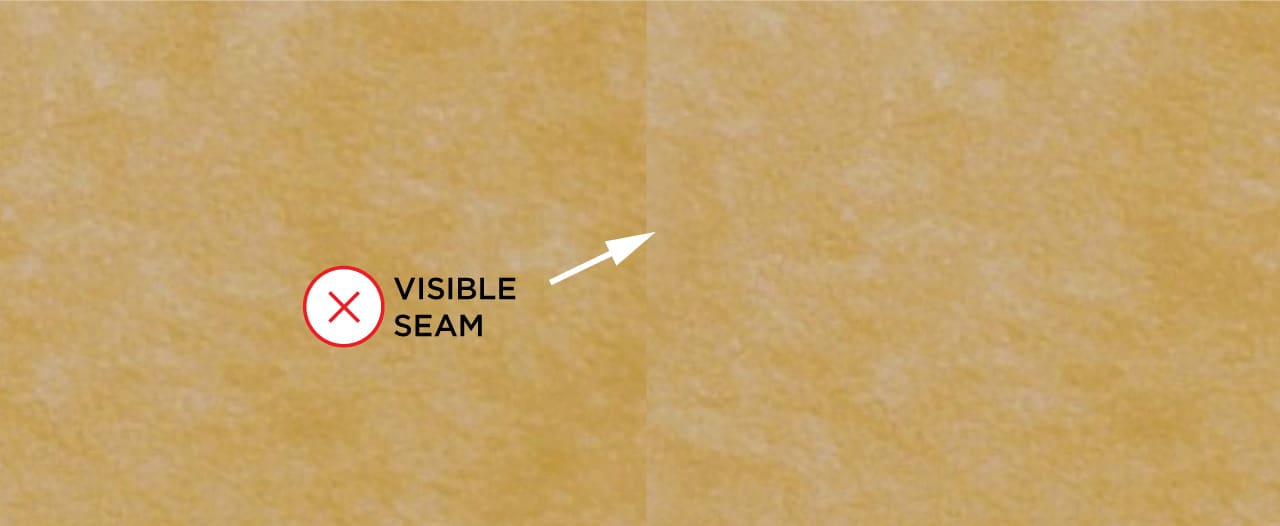
This process usually quite straightforward when printing solid colors, but extra care must be taken when a background has a texture or uneven colors like gradients so everything aligns without any visible edges or seams.
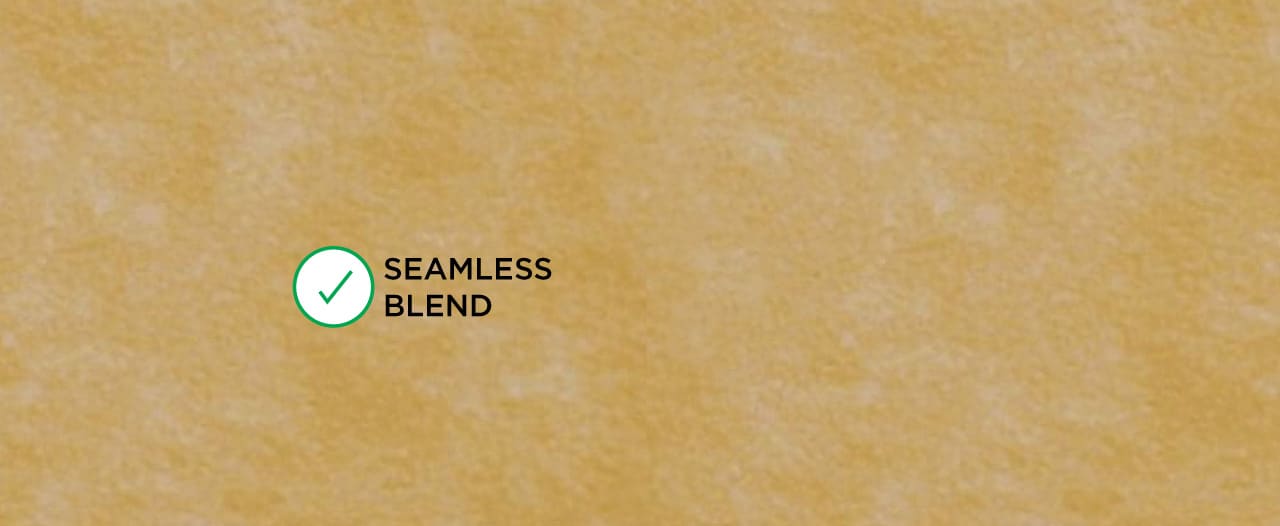
Here’s another example from a client: their design included a parchment texture in the background. On its own, again, everything looks great. But as soon as the pattern is put side by side it is clear where one ends and another begins.
In this particular case our designers opened the file in Photoshop and used the trusty rubber stamp tool with a large, soft brush (hardness set to 0%) in order to borrow textures from other places and create a smooth transition.
Designing Wallpaper Murals
Since murals are designs that occupy an entire wall, more consideration should be given to the placement of design elements. You don’t want the focal point or best parts of your mural covered up or out of place. Many of these decisions will come down to personal preference.
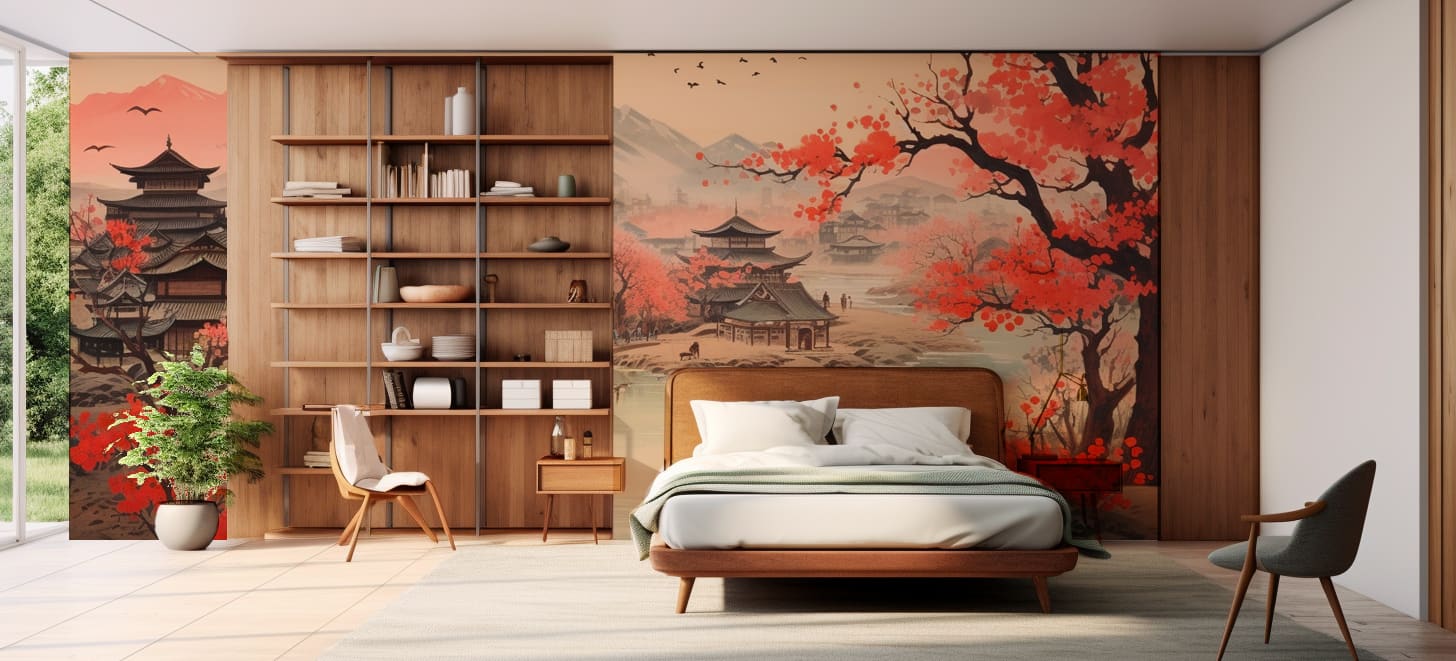
For example if you enjoy nature, the following orientation of this wallpaper might seem more appopriate near the bed.
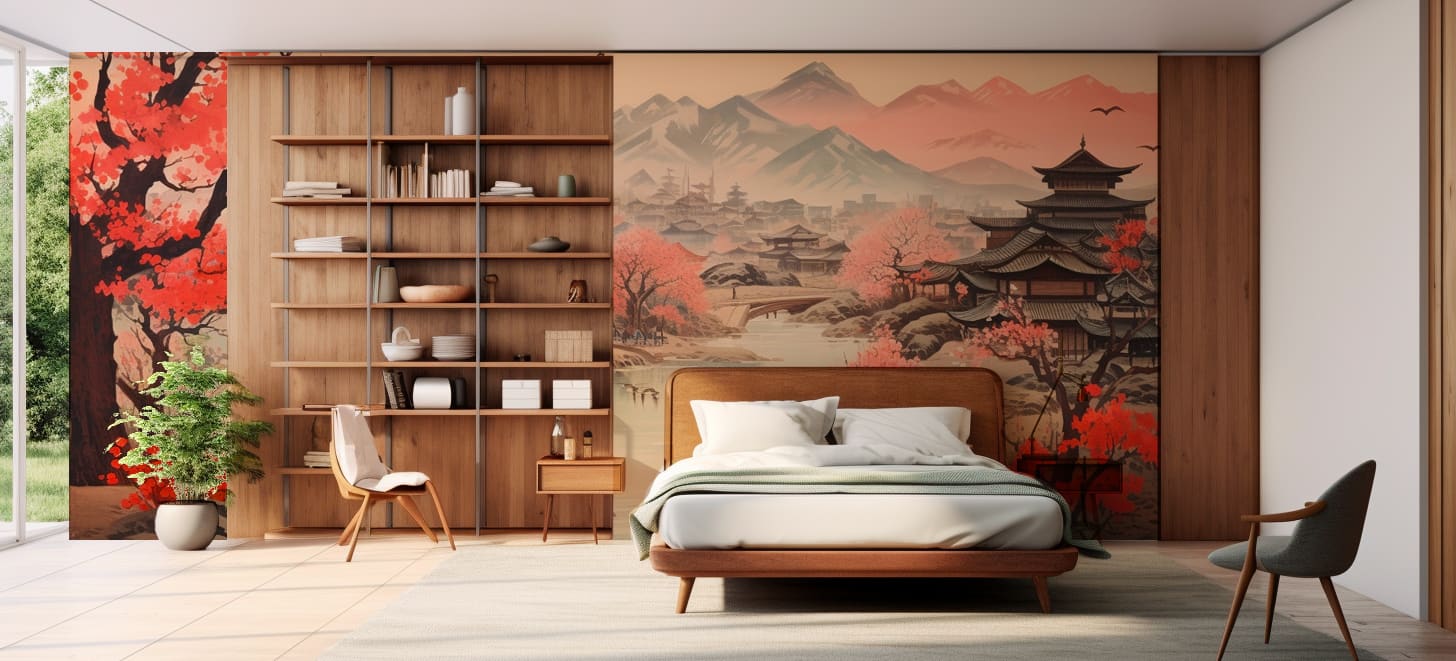
Or if you are a more cosmopolitain type you may prefer to flip the canvas and rest under a scenic view.
Regardless of preference, a successful design will interact with its surroundings, including furniture, lighting and accessories to create a harmonious composition of your space that best reflects your character/aesthetic.
Technical Requirements
Murals require far larger file sizes so you will need a speedy CPU with at least 8-16GB of RAM to edit, process and potentially repair a large image. Since the files are often greater than 4GB they will be need to be saved as Large Document (.psb) files.
You will also need a digital printshop which can produce rolls of printable wallcoverings at least 48” in width. Find someone with a proven track record in large format printing and graphic design services to ensure quality.
NOTE: We highly recommend paying for press proofs. These are small samples to provide an accurate preview of your final rolls. This is also the phase where you can catch mistakes, correct colors, and potentially save a lot of wasted time/resources. If color and quality matter to you, always print proofs before pulling the trigger.
Digitizing Old Wallpaper
Sometimes designing a wallpaper from scratch is not as accessible or appealing as reproducing discontinued or rare wallpapers. Recent years have shown a great increase in the number of people remodelling their homes with a touch of wallpaper nostalgia.
The success of this method hinges on the quality of the original sample and the quality level of your scanning equipment or camera. This is not a task for novice designers. You will definitely want to contract people who specialize in this process and have a proven track record for quality and service.
As this process is beyond the scope of this article, we recommend learning more from a related article: “How to Reproduce Existing Wallpaper Designs”
Wrapping It Up
We hope that this article serves as a starting point for anyone interested in producing their own custom wallpaper rolls for remodels, renovations and the purchase of new property which continues to drive demand in this growing sector of the printing industry.
Designing files for wallpaper doesn’t have to be complicated or stressful, but the truth is it certainly can be, depending on the level of your proficiency and ambition. If you ever need a proper assessment of your project, or just want to talk to a pro about all things wallpaper related, feel free to Call Us at 212.619.5446.